:: Linux 환경에서 Terraform 을 사용하여 Azure 에서 Resource 생성 및 관리를 위한 Admin 서버 구성
:: Linux yum 패키지 설치, repo 추가, terraform 패키지 설치
- Centos VM 생성
- Terraform 설치
$ sudo yum install -y yum-utils $sudo yum-config-manager --add-repohttps://rpm.releases.hashicorp.com/RHEL/hashicorp.repo
$ sudo yum -y install terraform
3. Azure RBAC ( Service Principal ) 생성
:: RBAC ( Role-Based Access Control ) - 역할 기반 액세스 제어
:: 클라우드 리소스에 대한 액세스 관리
- 기본적으로 생성된 역할들이 있고, 별도의 사용자가 원하는 권한을 설정한 역할을 만들 수 있다.
참고 :: https://docs.microsoft.com/en-us/azure/role-based-access-control/built-in-roles - 생성된 역할
참고 :: https://docs.microsoft.com/en-us/azure/role-based-access-control/custom-roles - 별도의 사용자 지정 역할
- Azure RBAC 생성
RBAC 을 설정할 구독에 로그인
az login --user <ID> --password <password>Login 한 계정의 구독 확인
az account list --output tableRBAC 을 설정할 구독 선택
az account set --subscription "output table에서 확인했던 Name or ID”설정된 구독 확인
az account showRBAC 생성
az ad sp create-for-rbac --name=”dkkim-azurecli-20220804” --role=”Contributor” --scopes=”/subscriptions/XXXXXXXX-XXXX-XXXX-XXXX-XXXXXXXXXXXX” ( 주의 : 아래 결과값의 password 는 추후 확인 불가능 )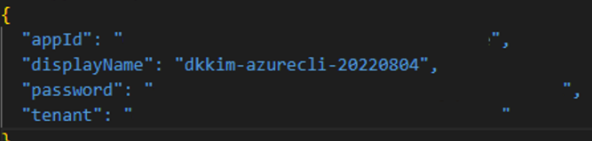
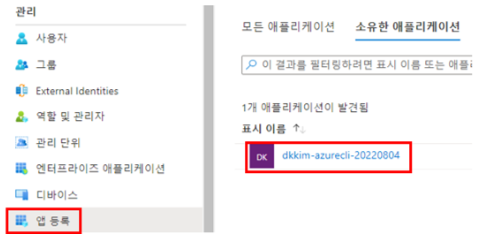
Azure AD(Entra ID) - 앱 등록 - 애플리케이션에서도 생성된 것을 확인 가능
- 생성한 RBAC 의 정보를 2가지 형태로 사용
a. main.tf 파일에 해당 정보를 입력해 놓고 사용
( 아래의 값이 노출 될시 azure 구독에서 resource 를 생성 권한이 생겨서 위험 )
provider "azurerm" {
  #subscription_id = "xxxxxxx-xxxx-xxxx-xxxx-xxxxxxxxx"
  #client_id = "xxxxxxx-xxxx-xxxx-xxxx-xxxxxxxxx"
  #client_secret ="xxxxxxx-xxxx-xxxx-xxxx-xxxxxxxxx"
  #tenant_id ="xxxxxxx-xxxx-xxxx-xxxx-xxxxxxxxx"
  features {}
}
b. CLI 에서 전역 변수로 설정 후 사용 - 권장
#export ARM_SUBSCRIPTION_ID="xxxxxxx-xxxx-xxxx-xxxx-xxxxxxxxx"
#export ARM_TENANT_ID="xxxxxxx-xxxx-xxxx-xxxx-xxxxxxxxx"
#export ARM_CLIENT_ID="xxxxxxx-xxxx-xxxx-xxxx-xxxxxxxxx"
#export ARM_CLIENT_SECRET="xxxxxxx-xxxx-xxxx-xxxx-xxxxxxxxx"
'Work > Terraform for Azure' 카테고리의 다른 글
| Terraform Public_ip.tf (0) | 2024.01.04 |
|---|---|
| Terraform vnet.tf (0) | 2024.01.03 |
| Terraform resourcegroup.tf (0) | 2024.01.03 |
| Terraform main.tf (1) | 2024.01.03 |
| 윈도우 환경에서 Terraform 환경 설정 for Azure ( Windows, Visual Studio Code, Azure ) (1) | 2024.01.02 |


